Setting up WordPress “the right way”; All you need is the right insight. Many people would like to get into blogging or website development yet the task seems a little to daunting. This article will break down everything you need for setting up wordpress the right way. You will also have a very nice looking blog that has the right settings for Server Setups, Folder Permissions, Comment Setup, Spam Protection, Social Media Sharing, feed setups, and pre wiring the blog for Search Engine Optimization. What this article entails is plain and simple setting up wordpress properly.
Download WordPress Setup Files
Get a linux Hosting package (1and1.com, Godaddy, etc)
Getting your own domain space is an important choice. Your domain host will probably be who you end up sticking with for a while. For this reason, I usually go with trusted host like 1and1 and go daddy. Yes there are plenty of other smaller ones that try to offer you better deals, but I tend to go with the more trusted domain host that have really good business servers and useful back-end applications. A lot of the smaller ones don’t allow you to unzip on the server which you will realize is very important. Make sure you get a LINUX HOSTING PACKAGE!!!!
[button link=”http://www.1and1.com/?affiliate_id=75743 ” size=”small” window=”yes”]Go Get Hosting[/button]
Setup a Mysql Database from your webhost
Once you login to the backend of your domain, find and click on a section called MySql administration. What you want to do is create a new database.  With this new database, you will be given the following information:
Database Name:
Host Name:
User Name:
Database Password: (you fill this out)
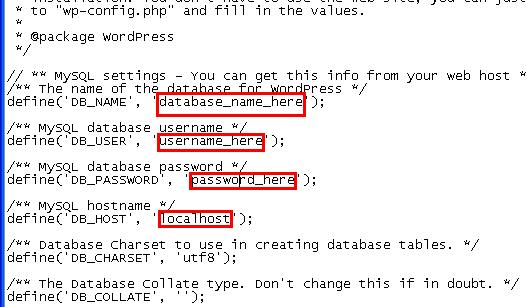
At this point you want to Unzip your WordPress Files. Open the folder that was created and find a file called “wp-config-sample.php” and rename it to “wp-config.php”. Open newly named wp-config.php and insert database settings (from above). Make sure to leave the quotes and just replace the information inside the quotes. Look at the graphic below for an example.
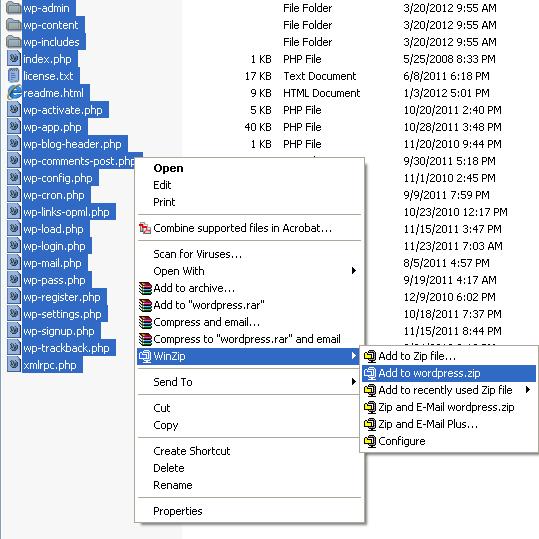
*******Zip WordPress Installation files NOT folder********
 |
 |
Upload WordPress Installation files to Server
This is where you upload your zip file to your webspace. Navigate to whatever webspace explorer that you use. You may also use filezilla if that is the way you transfer files to your server. Most domain host have a webspace explorer where you can upload files to your server. At this point you want to upload the wordpress zip file that you just created to the section of your website that you want the wordpress installation to be at. You can upload it to the root directory if you want your wordpress installation to be on for example ” http://www.yoursite.com” or, you can put it in a sub directory like “http://www.yoursite.com/blog” . Which ever is suffice for you. Once you upload the files to the proper folder on your server, Unzip the zip file to server in the directory that you want the install. At this point you can check the folder permission or (chmod) settings which should be 755 for folders and 644 for files. This is a good default setting.
WordPress Installation through Internet Browser
Navigate on your internet browser to where you put the wordpress installation (www.mywordpresssite.com) or (www.mywordpresssite.com/blog)
This will start you through the WordPress installation process. Run the install by filling out the required data. Fill in your Email and make sure to use the exact same email as you have registered with Gravatar.com. WordPress uses gravatar as the default avatar engine so make sure if you don’t already have an account with them, go and set one up.[button link=”http://www.gravatar.com” size=”small” window=”yes”]Go to Gravatar[/button] 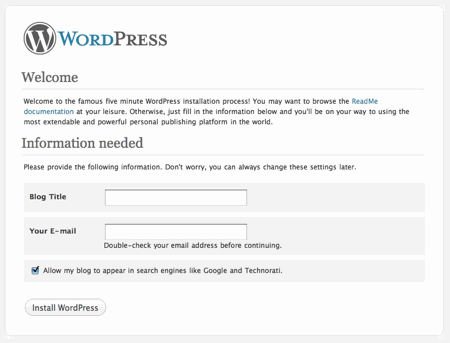
At this point the default wordpress installation is up and running. However, there are more things we need to do if we want to properly set up this wordpress installation including setting it up for mobile device post. You can click next to enter your blog. If you got disconnected somehow, just go to whereever you put your blog and type in the url “/wp-admin”. Example “www.markswist.com/wp-admin”. THis is the default login address for your wordpress setup.
Install WordPress Theme
There are a lot of good theme sites that have nice looking WordPress templates for very cheap. You can easily google many wordpress themes, however, if you would like my recommendation on theme providers here is a good list.
| Theme Provider | Theme Price | |
| Studiopress | $79.95 | |
| Elegant Themes | $39.00 | |
| WP Zoom | $69.00 | |
| WooThemes | $70.00 | |
| Thesis Theme | $87.00 | |
| ThemeFuse | $49.00 | |
| Theme Junkie | $39.00 | |
| Press75 | $175.00 | |
| Pagelines | $197.00 | |
| SoloStream | $79.00 | |
| Organic Themes | $69.00 | |
| ThemeShift | $50.00 | |
| Themify | $39.00 | |
| BizzThemes | $69.00 | |
| Mojo Themes | ??? | |
| Theme Forest | $35.00 |
WordPress Settings
Under Settings –> General
Pick the correct timezone
Under Settings –> Writing
Check the XML-RPC setting. This allows you to make post from third party devices such as your iphone, android phone, ipad, etc. Make sure you go to the app store for either device and download the free wordpress app. Here is an example of the setting.
To help with search engine optimization, the url structure of your website needs to be user friendly to search engines. Therefore, instead of having your url be post numbers generated by wordpress, your url needs to pertain to the keywords and post tittle. To change that, we input these settings:
Under Settings –> Permalinks
Click Custom Structure and input this exactly:
/%category%/%postname%/
Recommended WordPress plugins for effective setup
The last aspect of setting up wordpress is to start off with the right plugins. The plugins that we need to install at a minimum are as follows:
Spam Protection ( Akismet )
Akismet is the default plugin used for Spam Protection and it does a really good job. It actually comes standard with all wordpress installs. If you have ever blogged before, you understand the importance of spam protection. What you will need to do is to go to Akismet and sign up to get a key. Lets do that…..[button link=”http://www.akismet.com” size=”small” window=”yes”]Go to Akismet[/button] After you get your key, navigate to plugins –> installed plugins and activate Akismet. Once you activate, go to the plugins settings and input your key that you signed up for.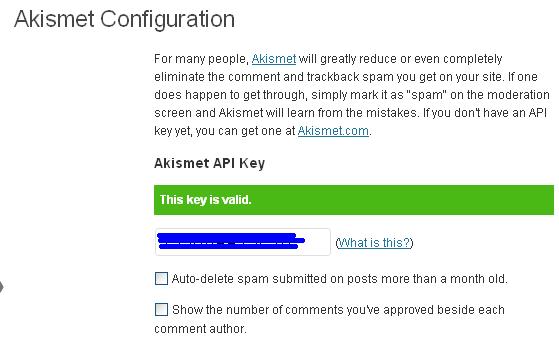
Comment Setup (Disqus)
Since you will be blogging, you will definitely want an interactive community. For an interactive community you will need to have a good comment system setup. Discqus is used all throughout the blogging world and is fairly reliable and common. The first thing you will need to do is to signup for a free disqus account. [button link=”http://www.disqus.com” size=”small” window=”yes”]Go to Disqus[/button]
After you setup Disqus, make sure that you add your new site under settings in Disqus.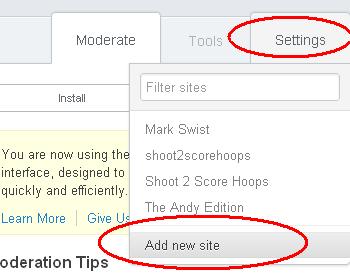
Once, you completed your disqus setup, go to Plugins –> Add New on your wordpress blog. search for “Disqus Comment System” and the first result should be the correct plugin. If not make sure to install the plugin that matches your search.
Social Media Sharing (Digg Digg, Social Metrics)
Digg Digg
To effectively promote your blog, you will need to have social network interactions. There are countless out there and Digg Digg does an amazing job of incorporating many of these social networks into your blog. This includes counters as well for the number of people who tweet, retweeted, facebook liked, shared on linkedin, etc. Navigate to Plugins –> Add New then search for Digg Digg. Install this plugin and you will get a new Digg Digg Menu towards the bottom of your dashboard. There you can tweak the Digg Digg Settings.
Social Metrics
Once you have incorporated Digg Digg with your blog, you want to manage those social media interactions. Social Metrics is a new plugin however it does an amazing job of allowing you to control everything in bulk. It allows you to tweet, like, +1, etc right from the dashboard and to look at all the different counts from the networks you are signed up for. If your count isnt as high in a particular blog, just like it, +1, tweet it, etc right from the dashboard .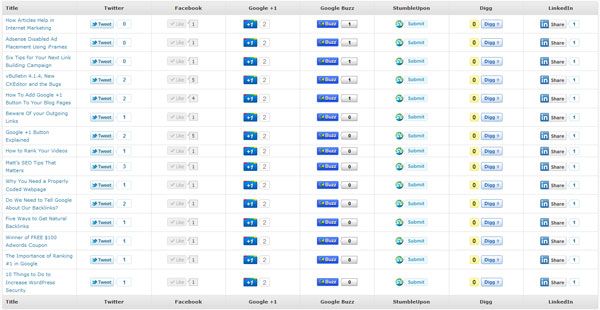
Search Engine Optization, SEO ( All in One SEO Pack, Google XML Sitemaps)
All In One All in One SEO Pack
The most important thing that you want to be aware of is how your blog does in search engines. Search engine optimization is an art form in itself and All In One SEO pack does an amazing job of helping you optimize your blog for the various spiders that crawl your site. The next recommended plugin I have is the tried and true All In One Seo Pack. This plugin has been around for a while and while there has been others such as the one by Yoast that provide good competition, All In One has been through the test of time. I recommend getting the pro version which cost $39.00
Google XML Sitemaps
Google, Yahoo, Bing and other search engines crawl your site all the time to make sure it can read everything. If it can “Index” your site properly, all your content will be accounted for. To aid these spiders that crawl your site, a Sitemap needs to be submitted to the different search engines. Google XML Sitemaps does just that.
That concludes my proper wordpress setup walkthrough. Please comment, Like and tweet for me.


